My electric meter going backwards

After install we were allowed to turn on our solar panels, and low and behold my meter started going backwards!

My electric meter

Something I didn’t know at the time, and wish someone had told me, was that these old style meters are way more lucrative with solar power. This is because you get credit for all the power you are putting back – including distribution charges. This is a material impact as per my financial post.

Clearly the panels were working, which was very exciting!

Unfortunately i was in a rush to get my net-meter installed, which in hindsight I should have just let the very slow wheels of Enmax do on their own sweet time…

Solar Installation

Getting an install date

Like many things during COVID Solar YYC was having various supply problems. The original panels (Longi 360) weren’t available, so we ended up getting Longi 375 watt panels. They were slightly larger so the system would be a little bigger which was nice. Total system size moved to 12 kilowatt.

We were able to keep our micro-inverters which were AP System QS1 & YC600.

Once the panels were available we then ran into various other shortages including the shake flashing. But finally the big day came in the early fall. About 3 months behind plan, and production would be lost for the peak summer months, but I figured it wasn’t going to be any better next year so might as well go ahead.

Installation

The crew arrived, was nice to talk to and began getting things organized. The only significant hitch was with the new panels my roof vents were in the way for some panels and four had to be put on the North side of the roof. Not ideal but I figured it was better than not having them.

The first day was getting most of the rails and flashing in place and levelled.

Rails in place
Rails in place with flashing

Next day was getting the rest of the rails and the micro-inverters starting to get laid out.

Micro-inverters getting laid out on rails
Micro-inverter mounted

The next day was the big day – the panels went on!

Panels installed
North panels

Solar Clubs

Something I learned about in my journey is the significant advantage of Solar Clubs in getting a solar generation rate for power produced. This was legislated in Alberta a few years ago under the NDP government. Essentially any site can be made a small micro-generator which enables you to get credit for power produced. As per my financial analysis this is a game changer for economics of solar systems.

Since this Solar Clubs have been created or added. These clubs enable a small producer like me to access these higher rates once I am an approved micro-generator. Solar YYC took care of my micro-gen application and approval so everything was done as part of my installation.

Below are a few of the solar Clubs I am aware of. They all seem to be the same and I will have to decide in the spring when I switch to a production plan. I won’t switch until then as I have a pretty good rate from ATCO right now.

Foothills Energy Coop

A local Cooperative that serves the foothills of Alberta. They have normal energy plans and a Solar Club plan you can see below.

Foothills current rates

Like most of these programs you have to call in to switch between the low rate and high rate in the spring and fall. Getting the high rate will add up quick in the summer.

Like most of the solar club plans they have the 2% cash back on power you consume. They also include 50% renewable energy on what you consume which is great.

Foothills donates their profits to local energy projects which is nice.

Park Power

Another company I heard of was Park Power. They have the same rates as Foothills, and everyone else I saw in Alberta, but have a better explanation of how the billing works.

Spot Power

Spot Power is a local Calgary company and has the standard solar club rates. The nice part of Spot is they provide Air Miles which seems like a small, but nice addition. Will have to decide what to do once the sun is out a bit more.

Solar Financial Analysis

Government Programs

Living in Calgary, Alberta there were no municipal or provincial government programs available when I was looking into installing solar. Luckily for me the Government of Canada decided to launch a Greener Homes Grant through NRCAN. It is always nice of the government to bribe me with my own tax dollars!

Wit this grant you can get up to $5000 of home retrofits and the cost of a home energy assessment up to $600. You have to get an initial home assessment done (before work begins) and then after the work is completed.

For interest there a provincial program for municipalities here.

Getting the grant

Nothing dealing with the government is easy. I had a hard time finding a solar energy assessor, and while I received a tracking number after applying that was it.

Eventually I did get an assessment which I will provide in another post, however, never heard boo from NRCAN. I did call the 1-800 number which was especially useless. I said I applied about 5 months ago and haven’t heard anything. The answer was they couldn’t see the status of my application. I asked why the site says most people hear in weeks not months; the response was we can’t see anything. I mean why have a 1-800 number if the agents have no visibility to anything?

After nearly 6 months my application was finally approved, after the solar already installed. Now I just have to get a final energy audit.

Financial Analysis

I love Excel. It can do all sorts of great things, like estimate how long a solar system will take to pay off.

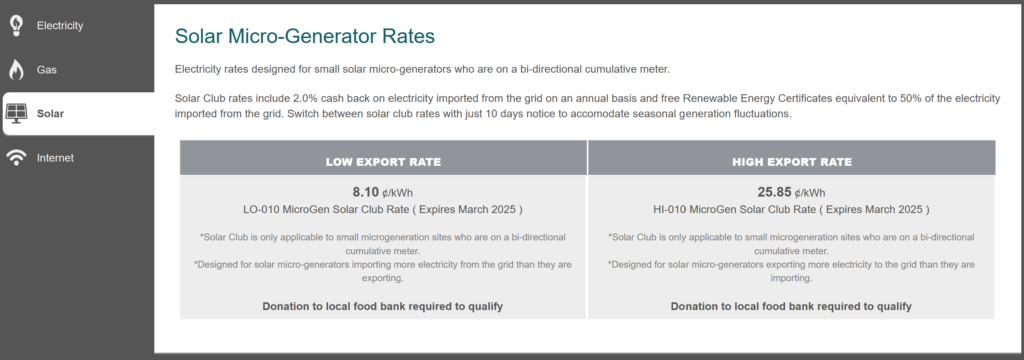
I had a couple of payback estimates from the folks that originally gave me quotes. Both seemed to say payback was about 9 – 13 years. This was primarily due to Solar Clubs and bi-directional metering. Essentially you can get a higher rate while you are producing more solar than you are consuming. The rate was about 26 cents a kWh so material. The bigger the system the quicker the payback if you are over 100%.

My big model error

While the solar rate is great, I made a fundamental error in my model. When calculating the value of my power I included the variable distribution costs. So in my system I assumed a total power cost of 13 cents, of which 7 was variable energy costs and 6 was distribution. This is true for power I consume, HOWEVER, it is not true for power I push to the system. I only get credit for the production (7 cents in this example). This was materially less than I had modelled, so my payback will be longer than expected.

I should note that both of the companies that provided financial models made this same assumption so were certainly showing an accelerated payback.

Distribution Cost Avoidance

Given how much the monthly fixed and variable distribution costs are (generally significantly more than the actual energy costs) I wanted to avoid them as much as possible. The way we have been doing that after discovering the model issue above is to use our high energy devices in the daytime. For example we used to run our dishwasher at night, but it would make far more sense to run it during the day when we had solar production. The difference is about 6 cents a kWh of variable distribution charges – nearly as valuable as the actual power!

Go Peer After a Year

I have been auto-investing a little bit each month on the goPeer Peer to Peer (P2P) lending platform for the past year and a bit. This post is to provide some real world results of their platform.

Overall the investing process is very straight forward with auto-invest. I had set it to invest the same amount on loans graded C- or higher a year ago.

Looking at my results for the year below I was concerned as my delinquent amounts are nearly as much as my total earnings.

Results after a year or so

This is obviously not great, so I did another level of investigation looking at the amounts in Delinquent status. Mostly they are late but at least one is classified as in default (but not charged off I guess). Interesting 100% of my Delinquent loans are rated at C-. Given this I changed my auto-invest to be C or higher.

Overall the experience has been pretty good, and I plan to continue making regular monthly contributions so see things improve over the coming year. The rates are very strong even on B and C loans, and I would rather take a little less interest and get paid back!

If you are interested in anything leave a comments, and it would be great if you used my referral code so we can both get $30. You just have to open an account and invest $1000.

Implicity Aquired by Assiniboine Credit Union

Over the past year and a bit I haven’t used my Implicity account a ton as I have been getting better rates from EQ Bank. However, I still have some savings at Implicity. As you may have heard they agreed to merge (aka be acquired) by Assiniboine Credit Union (ACU). I assume Implicity will be absorbed into Outlook Financial .

Assuming that my account will be moved into Outlook I expect a reduction in rates of about .1 to .2% as from my observations they are consistently a little lower than Implicity. I assume that ACU doesn’t need the deposits as bad.

I also see we are getting a new website which is good.

Solar Panels for my House

Background

My wife and I have been looking at Solar for years, but I could never make it make financial sense. I had looked into both solar water heating with vacuum tubes and solar photoelectric. This past spring we decided to take another look.

As you may know Calgary is very sunny generally, and a large portion of our power generation is coal, so it certainly would have positive environmental impact. You can see an approximate solar energy production estimate at several sites like PVWatts from the US Government.

Through some research it seemed like it might now make at least some financial sense (i.e. an eventual payback).

System quotes

With some hope I reached out to about 4 solar installation companies in Calgary. A couple replied with a very high level quote using a satellite image of my house. Their quotes probably were good enough for my initial needs.

Two companies did come and visit my house to take a look and give me a more detailed quote with some explanations. Prices were fairly similar within about 15% or so.

The big difference I found between the companies was their ability to answer questions and explain why they recommended what they did. The one company was clearly a salesperson with no solar background and really couldn’t tell me why they were commending what they were.

Vendor Selection

We ended up selecting SolarYYC. They were very helpful in explaining things to us, and came back and did an electrical assessment to provide a firm quote.

One of the biggest reasons I chose SolarYYC was they use micro-inverters. The other providers seemed to a single larger inverter.

Solar Micro-inverters

Solar Micro-inverters as per Wikipedia “is a plug-and-play device used in photovoltaics, that converts direct current (DC) generated by a single solar module to alternating current (AC). Microinverters contrast with conventional string and central solar inverters, in which a single inverter is connected to multiple solar panels. The output from several microinverters can be combined and often fed to the electrical grid.

Microinverters have several advantages over conventional inverters. The main advantage is that they electrically isolate the panels from one another, so small amounts of shading, debris or snow lines on any one solar module, or even a complete module failure, do not disproportionately reduce the output of the entire array. Each microinverter harvests optimum power by performing maximum power point tracking (MPPT) for its connected module.[1] Simplicity in system design, lower amperage wires, simplified stock management, and added safety are other factors introduced with the microinverter solution.”

The primary disadvantage is micro-inverters cost more initially. My south roof has a large tree on the north east side, and a chimney in the middle I knew I would get a fair amount of shading. Given this micro-inverters became quite important to me, so this was a great benefit of the SolarYYC proposal.

Implicity Financial

There are a number of high interest savings options in Canada. As I have said before I used Tangerine (previously ING Direct) until their rates went in the toilet after Scotia Bank bought them. I was working in the credit union system at the time and so found Implicity. It is a online only brand from Entegra Credit Union in Manitoba buy available to anyone in Canada. Overall I like them and use them.

Overall Experience

Implicity’s website is basic, as is their online experience. Overall it was a bit of hassle to set up having to manually provide a couple of things, however, it wasn’t crazy. Once setup you get a debit card number and can start logging in. Setting up accounts involves sending in a form with your banking information and getting it linked to your account. Once setup you can move money via EFT’s at no cost. You also get the interest on the day you initiate the transfer which is nice. Like EQ Bank there are no minimums and no fees. Also you can pay bills, send eTransfers and setup multiple accounts. Unfortunately with Implicity you have to send an email to add or change the name of accounts.

They offer a full range of accounts from savings, GIC, TFSA and RRSP options.

Rates

Current rates are competitive generally with other providers. They are currently less than EQ Bank but over time have consistently been better than Tangerine . Credit Unions are insured by their provincial government (so Manitoba in this case) for 100% of deposits as described here no matter where you live in Canada. Given Federal insurance is capped at 100,000 per account type per institution that could impact some people.

Mobile App

Terrible. Don’t download it. You can pay bills, deposit cheques, and inter-account transfers, but you can’t transfer money to external accounts – and isn’t that the entire point?

goPeer P2P lending

While looking at savings possibilities, one area that was always of interest was Consumer P2P lending (Person to Person) lending. This is where a lot of banks make considerable money, and certainly the rates people pay to credit cards and payday lenders is exorbitant. Personally I support trying to help people achieve financial health, and if you are paying 20% interest that isn’t going to be easy.

While Lending Club is quite popular in the US, there hasn’t been a similar service available in Canada until recently. goPeer is one such company, and advertises itself as the Lending Club of Canada.

Along with Lending Loop goPeer is federally regulated which means anyone can invest up to $10,000 per year in similar platforms. If you want to invest more than that a year you need to go through the accreditation process with goPeer.

Experience

The Investor sign up experience was pretty straight forward. Once again they use Plaid like with EQBank for linking accounts. There wasn’t an easy way to add non-Plaid working accounts and you can only add one account so pick one you can get money in and out of easily. Standard know your customer questions and you are ready to go.

Once the account is setup, you will have the ability to invest in consumer loans. The market place provides a fairly robust list of loans available. You can click on each one and read more about them like what the loan is for, applicant location, credit score, income, etc.

After the first few times clicking around, it gets pretty boring unless you plan is to invest large amounts. If you are investing the minimum $10 the time to review the applicant is costing more than the $10. So I turned on the auto-invest feature and selected the loan grades I was interested in (decided anything above a D) and the amount per loan ($30 for now).

Results so far

There are lots of people saying they have seen pretty high delinquency and write offs which would really impact returns. So I am quite interested in seeing how that plays out.

The marketplace seems to have a pretty robust set of loans so money is being invested reasonable quickly even at $30 a loan. Much better than Lending Loop.

After a little over a month I have invested in 17 loans, have 14 more pending (waiting for full funding and completion). The portfolio page provides a good detailed overview of what you have in place, and has a nice summary chart you can click on slices to drill down on.

Referral

Why not use my EQBank referral code? We both get $30 if you invest $1000 or make your first payment. I have to pay for my blog hosting somehow 🙂

EQ Bank

This post is to review the savings accounts of EQ Bank. Over the years I have tried to find a reasonable High Interest Savings account for any temporary or long term savings I might have. Things like an emergency fund are best kept liquid (in my opinion) in a vanilla account. I have tried quite a few out and ran across EQ Bank mainly because they were one of the first cloud core banking (which is what I work in) and they used the Temenos core. They were written up here.

In any event they do have pretty good savings rates , and had an interesting 3 month GIC rate that was pretty attractive. Their longer term GIC rates weren’t great, but that’s fine.

Sign Up

The sign up was pretty painless as they use Plaid which connected to my Tangerine account quickly and easily. My First Calgary Credit Union account is not available in Plaid, but hurrah they had a manual connection option. I entered my transit, branch and account manually, then EQ made a couple of micro deposits. I entered these into the EQ site a couple days later and voila I was connected. For interest you can also connect your high interest savings accounts together, like to Implicity, to speed the move of money to better rates

Account Features

Since then I moved some savings in which I plan to split into 2 90 day terms 45 days apart just so I have quicker access to half if it was ever needed. One feature I really like is it shows the interest earned in your GIC as of the night before.

There were a few things I would improve. There is no way to auto renew a GIC, which would be much better and is pretty standard for sites.

The account has a few other good features including free eTransfers, no minimum balance and cheaper international transfers. It also has the ability to pay bills, so could be a pretty robust overall account for saving for a larger annual fee (i.e. life insurance) or to put a bonus in and then pay certain bills or eTransfers from.

Mobile App

The site is well designed and I would say a pretty robust mobile app with all the information you need and the ability to deposit cheques.

Referral

Like many new services EQ Bank offers a referral program. Why not use mine here! If you use it we both get $20

Overall

I have moved the bulk of our savings to EQ Bank so I guess I had better give it 5 stars! We’ll see how it goes over the coming months, but for now it seems great.

The old garage

Here is the old garage as it was being demolished.

Demo start

When we bought the house it had a huge yard, and for some reason the garage was a relatively small double.  It also was about four inches lower than the alley so water ran into it.  Finally it was a solid six feet from the property line and at a strange angle.  So, the decision was made to get rid of it.

We did put it on Kijiji to try and sell it, and had lots of interest, but ultimately no one wanted to pay the money to move it.  Apparently free wasn’t free enough!  Regardless we were able to get rid of it and was fun to watch!

Demo complete!

The pad

Once the old garage was removed we created a new pad for the new 3 car garage.  We debated building on top of the old cement pad, but decided that was too risky, and it wasn’t in the right place.

So, we called our friendly survey company and had our property line marked out.  Given the research we did on local building codes we knew how close to the property line we could be, and we located the new pad so it was parallel to the alley property line.  In the end we decided to put it back a bit more than the minimum so we had a bit more room to get in and out, and made the apron two feet long.

The pad itself was made of recycled crushed cement which was relatively inexpensive, and was quick as the contractor removing the garage and old pad could get it when he dumped the old cement.

Once leveled (more or less) we packed the new recycled cement with our Toyota Highlander.  I watered it down with a sprinkler, then drove back and forth so the tires overlapped as I went.  It did a really great job, and was hard as a rock once dry.  Overall one of the best foundations I have seen so we were off to a good start.

The Plans

As with any building project you should start with plans for building.  In this case I started with the city’s website on building codes.  It turns out if you build a garage larger than a certain size you have to get a building permit (like a house) which adds a ton of time and money to the process.  So, I drafted plans that were just shy of the maximum in order to avoid that hassle which as you can see below was 24′ deep and 33′ wide.   The plans were made in Visio.

We put in 2 man doors with the thinking that one would access the separated bay (the man cave side) and one for the cars, which also was much closer to the backdoor of the house.

We put a wall in for the man cave side, mainly to give some additional space for putting the dart board and to keep the dust and so on to a minimum.

The windows were quite big we thought, but in the end were about right with good lighting in the 3rd bay in particular which was really nice.

In floor heating Preparation

If anyone has had the pleasure of working in a shop with heated floors, you will never want to build a garage or shop without them.  It is simply the only way to have it!

Heated floors have all sorts of benefits, but in a shop it is especially awesome as it melts all your snow and is a please to stand and work on.  In my case if you also use it as a man cave it makes playing darts easy, and working on a project in the winter is never a probelm.   The only issue I ran into was I had to install a ceiling (bathroom) fan and run it pretty much constantly in the winter as there was a ton of condensation as the heated floors do cause the water to evaporate rapidly.

So in Canada it is cold, and in any cold climate you need to insulate the floors from the surrounding environment.  This is especially important for on grade installations.  So we used R20 Dow Styrofoam rated for our load overtop our plastic vapour barrier.  We had to tape it together to hold it.  Note it is on both the wall and floor throughout.  We put a pile of nails into the walls at an angle to help hold it to the concrete when it was poured.

Insulation on side and bottom.

Once we had the vapour barrier and insulation we had to add rebar.  We used a simple square grid about 1′ apart.  You could use the 4″ concrete mesh but we find rebar more durable and really isn’t a ton of work.  Each cross was wired together to hold it.  Then we put 1/2″ floor plastic water pipe from Home Depot on top and tied them to the rebar (on top) using plastic zap straps.  That held everything in place really well.

I wasn’t sure that I wanted any joins so we ran all the runs to a single point as shown in the pictures.  One thing to note is we had 2 of the 3 on the double car side, so we could run that zone seperately.  The single car side we ran as a single zone so we could run additional heated water flow there. We did make sure none of the pipes crossed over each other as I had heard that could cause a hole over time.

The layout patter in the pictures really worked well with even heat, so I would do it similarly again.

Apron (alley) end

The Low side

Layout for house side

Keeping lines seperate

Run ends at manifold

Keep the pipes a bit away from outside wall